集群模拟拓扑
- 集群模拟结构:
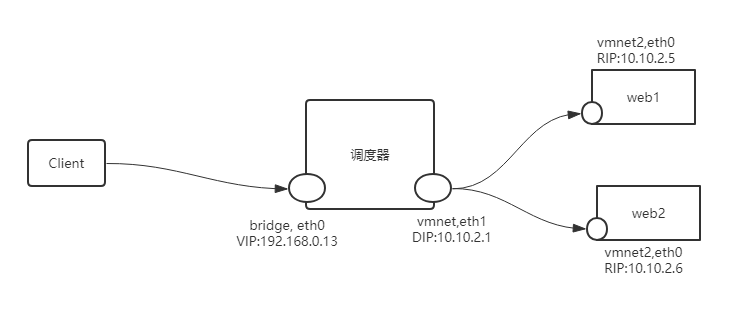
调度器IP:192.168.0.13
节点IP:10.10.2.5,10.10.2.7
客户机:192.168.0.14
环境搭建与之间的NAT步骤一样此处略...
ipvsadm工具
- ipvsadm安装
[root@gateway ~]# yum install -y ipvsadm
[root@gateway ~]# rpm -ql ipvsadm
/etc/sysconfig/ipvsadm-config
/usr/lib/systemd/system/ipvsadm.service
/usr/sbin/ipvsadm
/usr/sbin/ipvsadm-restore
/usr/sbin/ipvsadm-save
/usr/share/doc/ipvsadm-1.27
/usr/share/doc/ipvsadm-1.27/README
/usr/share/man/man8/ipvsadm-restore.8.gz
/usr/share/man/man8/ipvsadm-save.8.gz
/usr/share/man/man8/ipvsadm.8.gz- 工具命令参数
#第一条命令用于向LVS系统中添加一个用于负载均衡的virtual server(VS);
#第二条命令用来修改已经存在的VS的配置,service address用来指定涉及的虚拟服务即虚拟地址,server-address指定涉及的真实地址。
ipvsadm COMMAND [protocol] service-address [scheduling-method] [persistence options]
ipvsadm COMMAND [protocol] service-address server-address [packet-forwarding-method] [weight options]
#COMMANDS
    -A, --add-service: 在内核的虚拟服务器表中添加一条新的虚拟服务器记录。也就是增加一台新的虚拟服务器。
    -E , --edit-service: 编辑内核虚拟服务器表中的一条虚拟服务器记录。
    -D --delete-service: 删除内核虚拟服务器表中的一条虚拟服务器记录。
    -C --clear: 清除内核虚拟服务器表中的所有记录。
    -R --restore: 恢复虚拟服务器规则
    -S --save: 保存虚拟服务器规则,输出为-R 选项可读的格式
    -a --add-server: 在内核虚拟服务器表的一条记录里添加一条新的真实服务器记录。也就是在一个虚拟服务器中增加一台新的真实服务器
    -e --edit-server: 编辑一条虚拟服务器记录中的某条真实服务器记录
    -d --delete-server: 删除一条虚拟服务器记录中的某条真实服务器记录
    -L|-l --list: 显示内核虚拟服务器表
    -Z --zero: 虚拟服务表计数器清零(清空当前的连接数量等)
    --set tcp tcpfin udp: 设置连接超时值
    --start-daemon: 启动同步守护进程。他后面可以是master 或backup,用来说明LVS Router 是master 或是backup。在这个功能上也可以采用keepalived 的VRRP 功能。
    --stop-daemon: 停止同步守护进程
#PARAMETERS
    -t --tcp-service service-address: 说明虚拟服务器提供的是tcp 的服务[vip:port] or [real-server-ip:port]
    -u --udp-service service-address: 说明虚拟服务器提供的是udp 的服务[vip:port] or [real-server-ip:port]
    -f --fwmark-service fwmark: 说明是经过iptables 标记过的服务类型
    -s --scheduler scheduler: 使用的调度算法,有这样几个选项[rr|wrr|lc|wlc|lblc|lblcr|dh|sh|sed|nq]
    -p --persistent [timeout]: 持久稳固的服务。这个选项的意思是来自同一个客户的多次请求,将被同一台真实的服务器处理。timeout 的默认值为300 秒。
    -M --netmask netmask: persistent granularity mask
    -r --real-server server-address: 真实的服务器[Real-Server:port]
    -g --gatewaying: 指定LVS 的工作模式为直接路由模式(也是LVS 默认的模式)
    -i --ipip: 指定LVS 的工作模式为隧道模式
    -m --masquerading: 指定LVS 的工作模式为NAT 模式
    -w --weight weight: 真实服务器的权值
    --mcast-interface interface: 指定组播的同步接口
    -c --connection: 显示LVS 目前的连接 如:ipvsadm -L -c
    --timeout: 显示tcp tcpfin udp 的timeout 值 如:ipvsadm -L --timeout
    --daemon: 显示同步守护进程状态
    --stats: 显示统计信息
    --rate: 显示速率信息
    --sort: 对虚拟服务器和真实服务器排序输出
    --numeric -n: 输出IP 地址和端口的数字形式

## 常见的使用方式:
# 管理集群服务
ipvsadm -A|E -t|u|f service-address [-s scheduler]
ipvsadm -D -t|u|f service-address

    service-address:
        tcp: -t ip:port
        udp: -u ip:port
        fwm: -f mark

# 管理集群服务中的RS
ipvsadm -a|e -t|u|f service-address -r server-address [-g|i|m] [-w weight]
ipvsadm -d -t|u|f service-address -r server-address

    server-address:
        ip[:port]

    lvs-type:
        -g: gateway, dr
        -i: ipip, tun
        -m: masquerade, nat

# 清空和查看:
ipvsadm -C
ipvsadm -L|l [options]
    -n: numeric,基于数字格式显示地址和端口
    -c: connection,显示ipvs连接
    --stats: 统计数据
    --rate: 速率
    --exact: 精确值

# 计数器置零
ipvsadm -Z [-t|u|f service-address]

# 保存集群服务定义:
ipvsadm -S > /path/to/some_rule_file
ipvsadm-save > /path/to/some_rule_file

# 让规则文件中的规则生效:
ipvsadm -R < /path/from/some_rule_file
ipvsadm-restore < /path/from/some_rule_file
使用案例
注意:需要开启内核转发:net.ipv4.ip_forward = 1,RS需要添加路由否则无法访问RR调度配置
## 添加集群
[root@gateway ~]# ipvsadm -A -t 192.168.0.13:80 -s rr
[root@gateway ~]# ipvsadm -L -n
IP Virtual Server version 1.2.1 (size=4096)
Prot LocalAddress:Port Scheduler Flags
  -> RemoteAddress:Port           Forward Weight ActiveConn InActConn
TCP  192.168.0.13:80 rr

## 添加Real Server地址
[root@gateway ~]# ipvsadm -a -t 192.168.0.13:80 -r 10.10.2.7 -m
[root@gateway ~]# ipvsadm -a -t 192.168.0.13:80 -r 10.10.2.5 -m
[root@gateway ~]# ipvsadm -L -n
IP Virtual Server version 1.2.1 (size=4096)
Prot LocalAddress:Port Scheduler Flags
  -> RemoteAddress:Port           Forward Weight ActiveConn InActConn
TCP  192.168.0.13:80 rr
  -> 10.10.2.5:80                 Masq    1      0          0
  -> 10.10.2.7:80                 Masq    1      0          0

#测试结果
root@xiaoqi:~# curl 192.168.0.13
this is 10.10.2.7 server! is node1
root@xiaoqi:~# curl 192.168.0.13
this is 10.10.2.5 server! is node2
root@xiaoqi:~# curl 192.168.0.13
this is 10.10.2.7 server! is node1
root@xiaoqi:~# curl 192.168.0.13
this is 10.10.2.5 server! is node2
root@xiaoqi:~# curl 192.168.0.13
this is 10.10.2.7 server! is node1
root@xiaoqi:~# curl 192.168.0.13
this is 10.10.2.5 server! is node2
SH调度配置
以修改之前的配置实现
#修改为SH调度算法
[root@gateway ~]# ipvsadm -E -t 192.168.0.13:80 -s sh
[root@gateway ~]# ipvsadm -L -n
IP Virtual Server version 1.2.1 (size=4096)
Prot LocalAddress:Port Scheduler Flags
  -> RemoteAddress:Port           Forward Weight ActiveConn InActConn
TCP  192.168.0.13:80 sh
  -> 10.10.2.5:80                 Masq    1      0          0
  -> 10.10.2.7:80                 Masq    1      0          0

#测试结果
root@xiaoqi:~# curl 192.168.0.13
this is 10.10.2.5 server! is node2
root@xiaoqi:~# curl 192.168.0.13
this is 10.10.2.5 server! is node2
root@xiaoqi:~# curl 192.168.0.13
this is 10.10.2.5 server! is node2
root@xiaoqi:~# curl 192.168.0.13
this is 10.10.2.5 server! is node2


#把RS2的80端口调度到8080端口上
[root@gateway ~]# ipvsadm -e -t 192.168.0.13:80 -r 10.10.2.5:8080 -m
[root@gateway ~]# ipvsadm -e -t 192.168.0.13:80 -r 10.10.2.7:8080 -m
[root@gateway ~]# ipvsadm -L -n
IP Virtual Server version 1.2.1 (size=4096)
Prot LocalAddress:Port Scheduler Flags
  -> RemoteAddress:Port           Forward Weight ActiveConn InActConn
TCP  192.168.0.1:80 sh
  -> 10.10.2.5:8080               Masq    1      0          0
  -> 10.10.2.7:8080               Masq    1      0          0

#测试
root@xiaoqi:~# curl 192.168.0.13
this is 10.10.2.5 server! is node2
root@xiaoqi:~# curl 192.168.0.13
this is 10.10.2.5 server! is node2
root@xiaoqi:~# curl 192.168.0.13
this is 10.10.2.5 server! is node2
root@xiaoqi:~# curl 192.168.0.13
this is 10.10.2.5 server! is node2

#删除RS
[root@gateway ~]# ipvsadm -d -t 192.168.0.13 -r 10.10.2.7:8080
[root@gateway ~]# ipvsadm -d -t 192.168.0.13 -r 10.10.2.5:8080
[root@gateway ~]# ipvsadm -D -t 192.168.0.13
DR模型调度
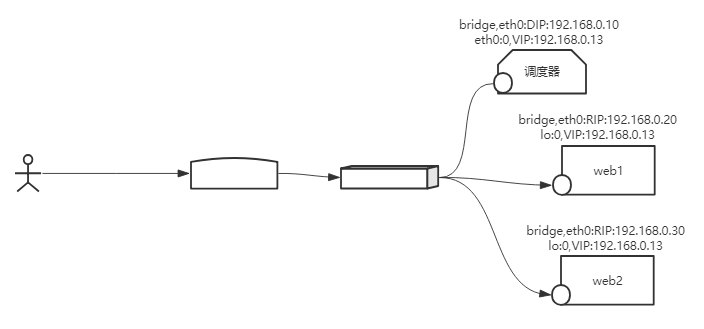
需要关闭arp通告,两个内核参数如下:
arp_announce  0表示所有网络地址都通告,1表示尽量通告给本网络的地址,2表示总是用最佳本地地址
arp_ignore  0:总是通告,1:请求报文从那个接口进来就通告那个接口

#修改方式如下:
echo 1 > /proc/sys/net/ipv4/conf/all/arp_ignore
echo 1 > /proc/sys/net/ipv4/conf/eth0/arp_ignore
echo 2 > /proc/sys/net/ipv4/conf/all/arp_announce
echo 2 > /proc/sys/net/ipv4/conf/eth0/arp_announce- 配置步骤
#1. 调度机器添加接口别名,需要指明掩码为32位 只广播自己.
[root@gateway ~]# ifconfig eth0:0 192.168.0.12/32 broadcast 192.168.0.12 up
[root@gateway ~]# ifconfig
eth0: flags=4163<UP,BROADCAST,RUNNING,MULTICAST>  mtu 1500
        inet 192.168.0.10  netmask 255.255.255.0  broadcast 192.168.0.255
        inet6 fe80::ce53:1b2:2b81:8606  prefixlen 64  scopeid 0x20<link>
        ether 00:0c:29:a6:a1:15  txqueuelen 1000  (Ethernet)
        RX packets 623  bytes 63928 (62.4 KiB)
        RX errors 0  dropped 0  overruns 0  frame 0
        TX packets 315  bytes 29558 (28.8 KiB)
        TX errors 0  dropped 0 overruns 0  carrier 0  collisions 0

eth0:0: flags=4163<UP,BROADCAST,RUNNING,MULTICAST>  mtu 1500
        inet 192.168.0.12  netmask 0.0.0.0  broadcast 192.168.0.12
        ether 00:0c:29:a6:a1:15  txqueuelen 1000  (Ethernet)
[root@gateway ~]# route add -host 192.168.0.12 dev eth0:0  #定义路由从这个地址进来必须从这个地址出去
[root@gateway ~]# route -n
Kernel IP routing table
Destination     Gateway         Genmask         Flags Metric Ref    Use Iface
0.0.0.0         192.168.0.1     0.0.0.0         UG    100    0        0 eth0
192.168.0.0     0.0.0.0         255.255.255.0   U     100    0        0 eth0
192.168.0.12    0.0.0.0         255.255.255.255 UH    0      0        0 eth0

[root@node2 ~]# ping -c 2 192.168.0.12
PING 192.168.0.12 (192.168.0.12) 56(84) bytes of data.
64 bytes from 192.168.0.12: icmp_seq=1 ttl=64 time=0.590 ms
64 bytes from 192.168.0.12: icmp_seq=2 ttl=64 time=0.283 ms

#2. RS配置,必须关闭arp广播
[root@node1 ~]# echo 1 > /proc/sys/net/ipv4/conf/all/arp_ignore
[root@node1 ~]# echo 1 > /proc/sys/net/ipv4/conf/eth0/arp_ignore
[root@node1 ~]# echo 2 > /proc/sys/net/ipv4/conf/all/arp_announce
[root@node1 ~]# echo 2 > /proc/sys/net/ipv4/conf/eth0/arp_announce

[root@node2 ~]# echo 1 > /proc/sys/net/ipv4/conf/all/arp_ignore
[root@node2 ~]# echo 1 > /proc/sys/net/ipv4/conf/eth0/arp_ignore
[root@node2 ~]# echo 2 > /proc/sys/net/ipv4/conf/all/arp_announce
[root@node2 ~]# echo 2 > /proc/sys/net/ipv4/conf/eth0/arp_announce

#3. 配置lo接口别名与添加路由
[root@node1 ~]# ifconfig lo:0 192.168.0.12/32 broadcast 192.168.0.12 up
[root@node1 ~]# route add -host 192.168.0.12 dev lo:0
[root@node1 ~]# route -n
Kernel IP routing table
Destination     Gateway         Genmask         Flags Metric Ref    Use Iface
0.0.0.0         192.168.0.1     0.0.0.0         UG    100    0        0 eth0
192.168.0.0     0.0.0.0         255.255.255.0   U     100    0        0 eth0
192.168.0.12    0.0.0.0         255.255.255.255 UH    0      0        0 lo

[root@node2 ~]# ifconfig lo:0 192.168.0.12/32 broadcast 192.168.0.12 up
[root@node2 ~]# route add -host 192.168.0.12 dev lo:0
[root@node2 ~]# route -n
Kernel IP routing table
Destination     Gateway         Genmask         Flags Metric Ref    Use Iface
0.0.0.0         192.168.0.1     0.0.0.0         UG    100    0        0 eth0
192.168.0.0     0.0.0.0         255.255.255.0   U     100    0        0 eth0
192.168.0.12    0.0.0.0         255.255.255.255 UH    0      0        0 lo

#4. 主机ping DIP测试
root@xiaoqi:~# ping -c3 192.168.0.12
PING 192.168.0.12 (192.168.0.12) 56(84) bytes of data.
64 bytes from 192.168.0.12: icmp_seq=1 ttl=64 time=0.426 ms
64 bytes from 192.168.0.12: icmp_seq=2 ttl=64 time=0.391 ms
64 bytes from 192.168.0.12: icmp_seq=3 ttl=64 time=0.432 ms

--- 192.168.0.12 ping statistics ---
3 packets transmitted, 3 received, 0% packet loss, time 2001ms
rtt min/avg/max/mdev = 0.391/0.416/0.432/0.024 ms

#5. ARP地址
C:\Users\xiaoqi>arp -a
接口: 192.168.0.14 --- 0x4
  Internet 地址         物理地址              类型
  192.168.0.1           b8-f8-83-78-4d-f5     动态
  192.168.0.10          00-0c-29-a6-a1-15     动态
  192.168.0.20          00-0c-29-55-2d-c2     动态
  192.168.0.30          00-0c-29-7c-68-4e     动态

#6. 开启httpd服务
[root@node1 ~]# systemctl start httpd
[root@node2 ~]# systemctl start httpd
c[root@node2 ~]# curl 192.168.0.30
this is 10.10.2.5 server! is node2
[root@node2 ~]# curl 192.168.0.20
this is 10.10.2.7 server! is node1


## 添加ipvsadm规则
[root@gateway ~]# ipvsadm -A -t 192.168.0.12:80 -s rr
[root@gateway ~]# ipvsadm -a -t 192.168.0.12:80 -r 192.168.0.20:80 -g
[root@gateway ~]# ipvsadm -a -t 192.168.0.12:80 -r 192.168.0.30:80 -g
[root@gateway ~]# ipvsadm -L -n
IP Virtual Server version 1.2.1 (size=4096)
Prot LocalAddress:Port Scheduler Flags
  -> RemoteAddress:Port           Forward Weight ActiveConn InActConn
TCP  192.168.0.12:80 rr
  -> 192.168.0.20:80              Route   1      0          0
  -> 192.168.0.30:80              Route   1      0          0

#测试结果
root@xiaoqi:~# curl 192.168.0.12
this is 10.10.2.5 server! is node2
root@xiaoqi:~# curl 192.168.0.12
this is 10.10.2.5 server! is node2
root@xiaoqi:~# curl 192.168.0.12
this is 10.10.2.7 server! is node1
root@xiaoqi:~# curl 192.168.0.12
this is 10.10.2.7 server! is node1
版权属于:龙之介大人
本文链接:https://i7dom.cn/240/2020/26/lvs-dr-rrsh.html
本站所有原创文章采用知识共享署名-非商业性使用-相同方式共享 4.0 国际许可协议进行许可。 您可以自由的转载和修改,但请务必注明文章来源和作者署名并说明文章非原创且不可用于商业目的。